


About the Author: Arif Hussain is a US-based Photo-Enthusiast searching for the Illusive Camera body with 100 megapixels, that can take either Canon or Nikkor glass, and AE and AF on both have 21stops of DR, 24fps, iso range from 1 to 1 million, and 999 f2.8 AF points with -6EV capability. Also looking for a zoom lens that’s sharp tack wide-open, with a constant F1 aperture, from 10mm to 1000mm. The combo should not weight more than 2 kilos.
Introduction
We all love that look, where only the subject remains in our field of vision, and all else melts away.
In the days when I used Point and shoots to take family snaps, I focused on getting a sharp image… if the built-in lens was not good enough; I had to inject copious amounts of sharpening in post. I had to make each and every pore on the face of my subjects clear. After all, this was one of my primary jobs, to tell the truth, and tell it clearly. Soon I realised, these subjects were not as appreciative of my “clear” work … and my wife would turn around and say look at your friend’s shots, they are charming… and I would be like, are you serious, he can’t even get his background in focus……..
That got me starting to look at my shots more critically. As a gear head first and an artist second, it’s against my nature, to view the shot organically, but one of the first things I decided to improve upon, was to focus… no not ‘that’ focus, but focus on the subject while de-focusing everything else. This is an essential trait of good photographs, but almost critical in portrait photography. To have background Blur in our portraits, we don’t only need to understand the optical concepts involved, but also how our lens choices affect, the quantity of Background Blur. This is what we will talk about today.
The Photographer should be able to deliver a shot that first excites, and then continues to engage the viewer. There are several ways to do this, but let’s focus on one aspect, which is to keep an eye on the subject and away from getting distracted by the background. The background should melt away, and form a reference point, not become a secondary subject in itself; distracting the eye.
One way to isolate the Subject is by allowing the lens to focus on the subject, and simultaneously, defocus the background. All lenses with sufficiently larger aperture values (e.g. f/4 and larger) when shot wide open, have the potential to defocus a lot of the background. The size of the aperture is not the only determinant to the amount of out of focus blur (OOFB), but the Focal length (FL) & the distance of the subject to the lens also play a part in the quantity of OOFB.
We need to make a clear distinction of OOFB, with bokeh. They are often used interchangeably, but they are not the same thing. OOFB, refers to the ‘Quantity’ of a blur, while bokeh, and refers to the ‘Quality’ of a blur. Since the whole idea of subject isolation deals with de-cluttering the background, a good bokeh is necessary, because a bad bokeh with lots of OOFB is not going to de-clutter well, in fact the OOFB itself might be a distraction. Thankfully, the relationship between Bokeh and OOFB is, for the most part, a positive one. So leaving the topic of bokeh for another time, let’s talk about OOFB which is easier to understand.
Definitions and concepts
I wanted to add this section because many budding hobbyists are not clear on these concepts. If you are well versed with the basics of photography, you can skip this entire section and go directly to “Finally on to Quantity of OOF blur“.
There are many references available on the web that explain the optics involved, my assumption is the reader has some basic understanding of Optics and how larger apertures render backgrounds blurry, and small apertures render almost everything in-focus. (Look up Depth of Field)
- The Aperture
- The Ratio of the aperture opening to the Focal length (FL) also known as F-Stop*
- The absolute size of the Aperture opening in mm
- F-Stop vs T-stop
- The Focal length itself
- The distance of the Subject to the Camera
- The distance of the background to the Camera
- Depth of Field (DoF)
The Aperture

The aperture is a folding pupil like structure that sits in the lens and Primarily governs the amount of light that goes through the lens. It also determines the shape of the out of focus blur, which causes Bokeh.
It also has other impacts, some of which are:
- Filtering light from the corners of the lens elements where the lens elements might not be as sharp, and only allowing light to pass through the centre (sharpest) region of the lens element. This is why lenses generally get sharper when they are stopped down a bit.
- Affecting Chromatic Aberrations since less of the lens area is used to imprint CA to the sensor. The Aperture, however, is not the creator of CA, rather can lessen the effect. CA is primarily created by the curvature of the rounded lens elements trying to project an image on to a plane sensor. If the sensor were rounded like the retina, this would be less of a problem.
- Causes diffraction when stopped down too low. When the aperture is too small, it converges rays of light and almost works as a lens in itself, thereby altering focus at a micro-level. This phenomenon is always present, however, in large aperture situations, the light from the aperture opening dominates the diffraction caused by the Aperture. But as the aperture is closed, diffraction begins to surface and then eventually dominates the sharpness or focus of the lens. Diffraction gets severe at F/14 and beyond. A photographer has to choose between getting a sharp image or have sufficient depth of field. This is why experienced Photographers sometimes use Neutral Density (ND) Filters to lower light instead of letting the aperture do this. The sharpest region of the Lens lies in the middle range of F-stops, closer to the largest aperture.
The F-Stop
The F-Stop is a straightforward concept that is often misunderstood. This is because it is thought of as an absolute number, whereas it is, in fact, a ratio. It is the ratio of the physical size of the aperture to the FL of the lens. e.g. 100mm lens with 50mm Aperture size is an F/2 lens (100/50 =2). Similarly, an 85mm lens with a 47mm aperture is an F/1.8 lens. The larger the aperture, the larger the F-Stop number and the greater the OOFB. However, since the F-Stop number is only a ratio, i.e. a 1mm lens with 1mm aperture is an F/1 lens, but it does not have huge OOFB, in fact it almost has NO OOFB… (example is a pinhole camera with no lens but a 1mm hole…, it has huge Depth of field and renders almost everything in same focus).
Here is a sample of shots to demonstrate 2 concepts:
- One universally understood, i.e. How F-Stops determine Depth of Field (DoF) and secondly, for the same settings and focus; that…
- A larger aperture (stopped down 1-3 stops) gives sharper results on the plane of focus than a very small aperture like F32.

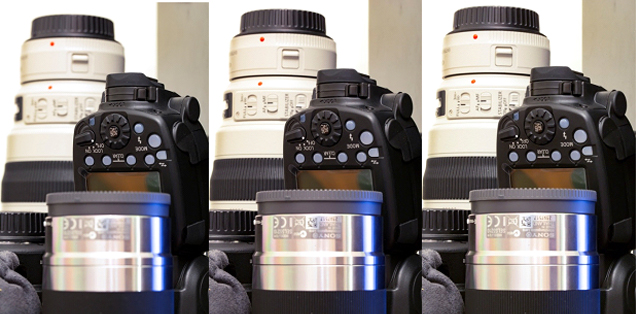
As you can see, smaller apertures like F32 will render the entire scene in focus due to their large DoF despite the subject being as close as 1 meter. However, there is a catch:
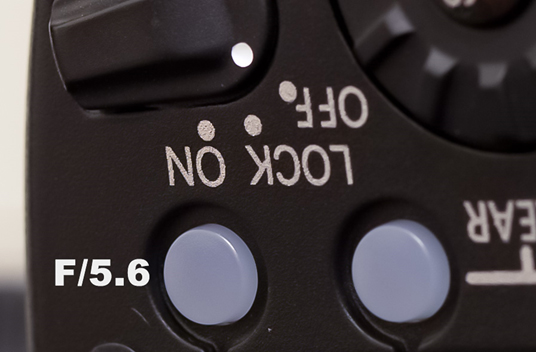
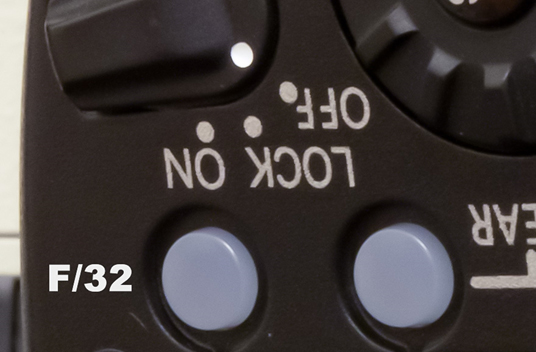
At a macro level, you may get more sharpness as you stop down to smaller and smaller apertures, but you begin to lose Microfocus because of diffraction, as can be seen here in a 100% crop. My focus was on the region between the letter O and N.
First at F5.6, which is one of the sharpest regions of this lens: You will note that there is little DoF here, but the sharpness at the Focal plane is quite high.
And now same shot, same focus, but at F32
If you plot the sharpness of a lens such that F-Stops are at the X-Axis, and Sharpness on the Y-axis, it will explain the sharpness bell curve better: Here is a chart showing how sharpness goes up as you stop down a lens, then begins to fall after a sweet spot is achieved, (usually between F5.6 and F11).
Referenced from http://www.csse.monash.edu.au/~carlo/M645-1000S.html Which in turn sourced it from popular Photography:

The Focal Length of a lens
The focal length is the physical distance of the sensor to the optical centre of the lens. Contrary to popular belief, it’s not magnification of the lens or how long it is. However, since there is correlation between putting the lens further away from the sensor to focus on an object far away, the two sometimes correlate well. Since lenses use several lens elements, physically determining the optical centre is complex. The FL also determines Field of view, but it does not necessarily determine magnification. For Magnification; the dominating factor is minimum focus distance, i.e. the closer we get to the subject and maintain focusing ability, the larger the subject will appear on the sensor.
The Crop factor conundrum: Since there are many formats or sensors used today, We need to understand the impact of using lenses designed for the FF format, used in Crop sensors. There is a misconception of how a 35mm lens translates into a crop sensor. Conventional wisdom says that in case of a Canon crop (1.6x), a 100mm FF lens used on a crop body like the 700d will act as a 160mm lens. Yes but this needs to be qualified, what aspect of the 160mm lens?
- The Reach?
- The Magnification?
- The Field of View (FoV)?
Typically only the FoV should be translated directly, it is, therefore, more accurate to say that using an FF lens on a crop body reduces the FoV of a 100mm lens to the FoV of a 160mm lens (for 1.6x crop factor, For Nikons it is 1.5x). The field of view, expressed in degrees is how wide the lens can see. So what you lose by going to a crop sensor is Width, you don’t necessarily gain length… since the optical centre of the FF lens’s distance to the sensor; still remains 100mm for both crop and FF cameras, it never changes!
The other two factors are dominated by different variables. Reach is determined by the density of the sensor, i.e. a 24mp sensor will give more reach/ details than a 12mp sensor using the same lens. Lastly, as discussed before, magnification is dominated by Minimum Focusing Distance of the lens. Reality is more complicated since sensor density also plays a part in magnification, but it is not the dominating factor.
*F-Stop is not the same as T-Stop
F-Stop is merely a measure of the ratio of the Focal length expressed as mm divided by the Size of the aperture opening, also expressed in mm. So a 100mm lens, with a 50mm aperture opening will have an F-Stop of 2. 100/50 = 2, so F2.
T-stop on the other hand, refers to the amount of light that passes through the lens element and hits the sensor, it has a relationship to F-Stop since the Aperture size would allow more or less light, however the T-Stop (Transmissive Stops) is a measure of the quality of the glass in terms of its resistance to light.
Meaning you could have a lens made of Black rock, and it could have an F stop of F2.8, but it would allow zero light to pass through to the sensor… the T-Stop would be huge, but F-Stop low. A perfect lens would have a T-Stop = F-Stop. In other words, T-Stop is an Adjusted F-Stop number, where things like light absorbance and reflectance are adjusted in the F-Stop number. For example, if a lenslet only 50% of the light in, and the F-Stop is F2.8, then the T-Stop would be F4 (which is one stop of light difference). The cameras bodies for the purposes of exposure calculation, ignore the F-Stop number and do a direct reading of the amount of light coming in since every lens will have a different T-Stop number.
The distance of Subject to Camera
This is simply the physical distance of the lens to the subject. I would like to introduce the Concept of framing here, along with Crop factor, to understand the impact on out of focus blur. A-frame is the relative size of the subject projected upon the Sensor. So you could have a 1-meter Subject cast a 1 cm image on the sensor in a full-frame Sensor. However, in a Crop sensor assuming same distance, the subject would be larger (Framing is different) because the relative area available on the sensor is less, and since Framing is relative, the crop factor will alter framing, so to keep the same framing, you will either need to move back, or push the subject back, till the same relative size appears on the crop sensor. For example, a Full frame (FF) sensor is 35mm x 24mm. A crop sensor is 24mm x 16mm. If the projected image on each sensor, is 10 mm x 20mm rectangle (10×20 =200mmsq), then as a percentage of sensor size, the Object covers about (35×24=840mmsq, and 200 / 840 =) 23.8% of the FF sensor and (24×16=384mmsq, and 200/384 = ) about 53% of the crop sensor.
Since Framing is relative, i.e. both sensors should have the same % coverage of the object, in this example, the same object, shot with the same FL lens, with the same distance to the camera, will NOT have the same framing. To get the same framing, we either move closer to the subject with the FF sensor, to increase coverage from 23.8% to 53% OR with the crop sensor, we move further back to bring down the subject coverage from 53% to 23.8 %.
The end result is that for the same Framing, the subject will always appear the same size on the screen if you compare the two sensors output on your monitor. The reality is, the subject with the crop will be much further away, than the one shot with the FF sensor, who will be closer, but will appear the same size on-screen relatively.
Its basic optics that the closer the subject is to the lens, the more blur the background gets, the farther away the subject is from the lens, the more in-Focus, the background is.
Now that we know Framing, it becomes easier to understand why the FF body can blur the subject more, with the condition that Framing is the same for both. (It’s critical to understand that with constant framing, the FF body needs the subject to be closer, and it is because of the subject distance that it gets more oofb).
Now, if the Framing is NOT the same, but the subject distance is the same for both sensors, then the Crop body will give more OOFB.
Depth of Field: DoF
Is a range of distances, between which the subject or the image will be in focus. Beyond the DoF (farther or nearer) things start to get blurry.
The factors that affect the DoF is primarily the F-Stop number and the distance of subject to the lens. So even if FL increases, but F-Number stays the same, AND the framing remains the same, then the DoF will also remain the same.
Constant F-Stop and Constant frame example
A 50mm f/2 lens trying to frame a full body shot will have a DoF of 29.7cm. And a 100mm F/2 shooting the same subject at the same framing (note distance changes to maintain the same framing of full body shot), will also have a DoF of 29.7cm
Distance with 50mm lens: = 3.96m
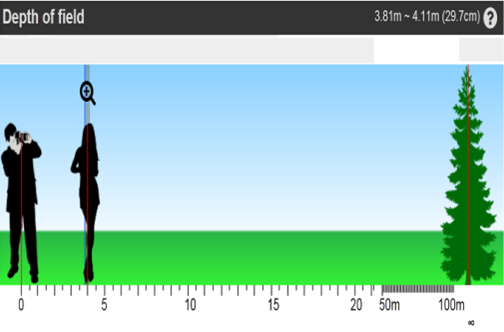
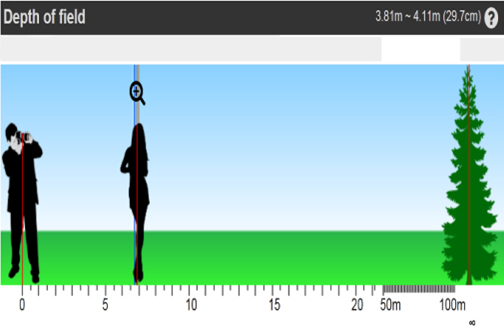
Distance with 85mm lens for the same framing = 6.73m
Please note: In both cases, the image recorded was a full body shot on the sensor.
Source: http://dofsimulator.net/en/
Constant F-Stop, Constant subject distance Example:
When we are not concerned much about framing, but about subject distance, other things being equal, the more the subject is closer to the body, the more OOFB we will get. This is why a 200mm lens will throw more of the background out of focus than a 50mm lens. (assuming framing does not matter).
Finally on to Quantity of OOF Blur
So then what determines the amount of OOFB in the distant background?
- The Absolute Size of the Pupil: To understand how much blur you will get in the background, it needs to be understood that the dominating determinant of OOFB is the Physical size of the Pupil, and not necessarily the F-Stop. (Because the F-Stop is a ratio).
For example, a 600mm F/4 lens has a 150mm aperture. A 200mm F/2 lens has a 100mm aperture, so when it comes to the background blur, the F/4 lens will cause more blur at infinity, than the F/2 lens(framing being constant). However, if the 200mm lens is F/1, then its aperture is 200 mm, and since 200mm is larger than 150mm, it will have a greater impact on OOFB at infinity. I know this sounds a bit contrary to conventional wisdom but needs to be understood. The next time you are purchasing lenses for Background blur, don’t use F-stop as the authoritative metric, figure out the Aperture size first.
- The FL of the lens: The longer the FL, the more OOFB we get. This a simple positive correlation.
- If you think about it, these two things combine, to make the F-stop number, and having a large F-Stop will give more OOFB. However, the relationship is not linear, and understanding this is the key to unlocking the mystery.
Depending on how far your background is, an 85mm F1.2 could out-gun a 200mm F2.0 lens. The 85mm F1.2 is one of FF’s largest relative apertures commonly used today that has AF, it is used for portraits galore. It has the wonderful ability to heavily blur objects not in the DoF right away. Meaning the near region to the DoF will be quite blurry, i.e. the slope of the blur curve for this lens is quite steep, However, it is steep for a while, then begins to become shallow, and at some point in the background, a 200mm F2 will start to throw more of the background blurry than the 85mm F1.2 can, even though in the near region the F1.2 lens is much more blurry… this can be easily demonstrated using the following graph.

As you can see, the 85mm has more blur till about 16 meters, beyond which the 200mm F2 has more oofb.
What about the more commonly used 50mm f1.8 vs 120mm F4?
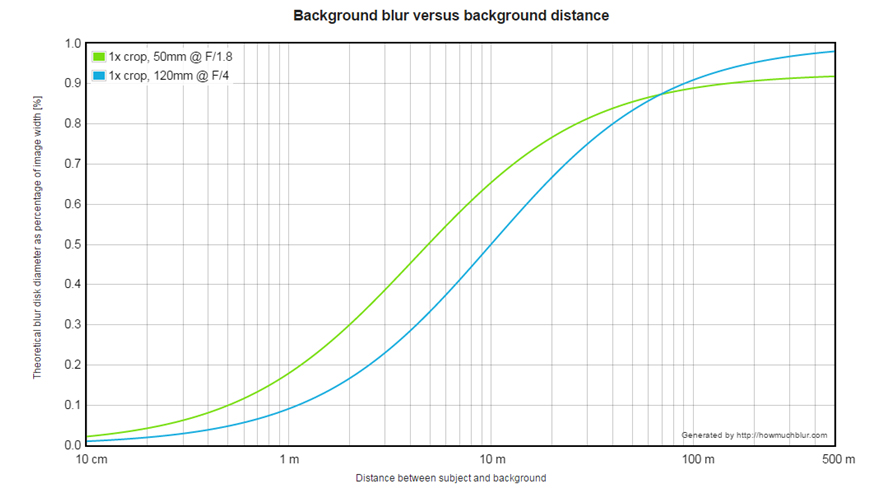
The 50mm holds on to the lead till about 70 meters where the 120mm F4 starts to make the background more blurry.
And what about some high-end lenses, how do they compare:
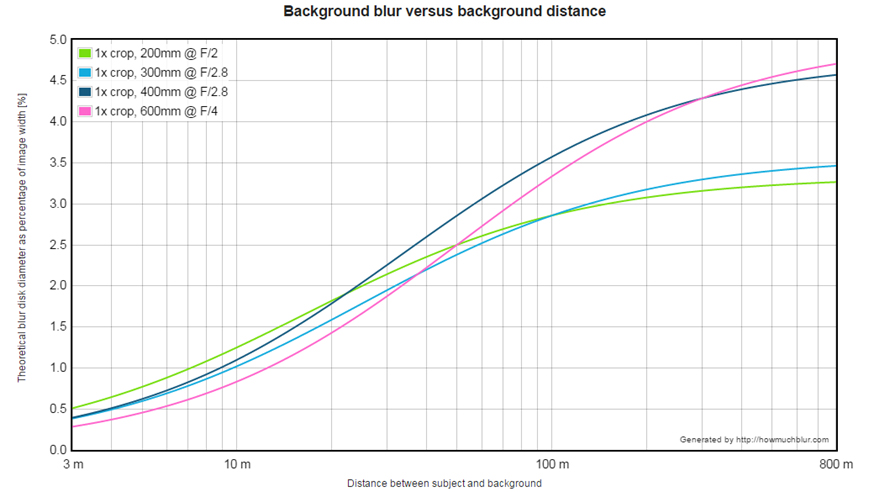
As you can see, single-lens wins the OOFB contest without us specifying the background distance limit. If the distance is assumed to be infinity, then in our FF (35mmx24mm) lens shootout, the 1200mm F5.6 is one that is hard to beat.
